
For those of you who decided to make Limoncello with us, the time has come to remove it from its deep slumber and perform the next steps to produce your own sweet, refreshing, porch-sippin’, summer-lovin’, happy, lemon liqueur. If you did not start your own Limoncello in January, you can get started now by reading Part 1. This recipe takes 80 days so you will still have your Limoncello ready to sip during the hottest days of summer.
This recipe is a bit less sweet and more “lemony” than some. If you have made it before, you will notice we removed some of the sugar. It will still be plenty sweet.
What you will need for this step:
3 1/2 cups water
3 cups sugar
1 750 ml bottle 100 proof vodka
What to do:
1) Boil the water in a sauce pan.
2) Add the sugar and stir until dissolved, making a simple syrup.
3) Cool the syrup to room temperature.
4) Put your nose near the top of your container of lemons and vodka that you prepared in Part 1. Remove the lid and inhale deeply with your eyes closed while dreaming of warm sun on your face. ahhhhh…
5) Pour in the simple syrup and the additional bottle of vodka.
6) Stir with a wooden spoon.
7) Replace the lid and put the Limoncello back into hibernation for another 40 days.
I have talked to a number of people who have started their Limoncello. In early April, we will all indulge in the first sip both reveling in the fruits of our labor and rewarding ourselves for our patience. We will strain the Limoncello, bottle it and stash it in the freezer for warm spring and summer evenings on the porch.
I hate creating waste so after completing Part 1, when we found ourselves with almost a dozen “skinless” lemons, I found many ways to use the lemon juice. If you are just starting your Limoncello and have some lemons to squeeze, here are some ideas from Eva at The Golden Shrimp. And, although I have not made them yet for fear of total addiction, these lemon yogurt fritters from Molly at Orangette look sinfully delicious.
No Tags

What is it about secret ingredients? In general, people tend to be bad secret-keepers. For many, gossip is magnetic and contagious. Unknown facts (or juicy pieces of fiction) hover in one’s brain anxiously waiting to burst out to a willing set of ears. But, with ingredients…cooks and bakers often hold their secrets close to the chest.
The most obvious reason to keep an ingredient secret is when the secret is making you a lot of money, i.e. Coca-cola, Kentucky Fried Chicken. I suppose ego is another stimulus. It feels good and makes us proud to make something delicious that nobody else can replicate. And then there is the mystique… don’t we all hunger for things we can’t have or don’t know? Finally, my favorite reason for keeping an ingredient secret: If you say an ingredient is a secret, you can later reveal the ingredient with an extra dose of drama! (Although in the end, this means it wasn’t really a secret at all.)
So, I will get back to this incredibly moist, delicious chocolate cake. A few years ago, I was considering starting an organic cake business. I get slightly obsessed with things sometimes and the development phase of this scheme was intense. I researched and baked a LOT of cakes. It was during this time that I discovered my secret ingredient and finalized my favorite chocolate cake recipe. Since then, I have fed the cake to many people including two professional chefs all of whom praised the cake but none of whom guessed my secret! Each time, I smiled from ear to ear and then excitedly revealed that the cake contained two and a half cups of….(drum roll please)

Beets. That’s right. Two and a half cups of cooked, pureed beets. I figured that if pureed carrots make my carrot cake recipe so moist and delicious, there must be other root vegetables that serve the same purpose. I researched beets in chocolate cake, fooled around with a few recipes I found, added a chocolate cream cheese frosting and… Voila! The best chocolate cake I have ever made. Give this recipe a try and add beets to your chocolate cake repertoire. But, keep it a secret!
Chocolate Beet Cake with Chocolate Cream Cheese Frosting
Makes 3 - 8 inch layers OR 2 - 9 inch layers with a few cupcakes.
2 1/2 cups cooked beets, pureed and then cooled
6 eggs, lightly beaten
3/4 cup cocoa powder
1 teaspoon vanilla
2 1/2 cups vegetable oil
3 3/4 cups sugar
3 3/4 cups flour, sifted
1 1/2 teaspoons salt
1 Tablespoon baking soda
Preheat oven to 350 degrees. Mix together beets and eggs and set aside. In a separate bowl, combine cocoa, vanilla and oil. Mix well. In another separate bowl, mix together flour, sugar, baking soda and salt. Add dry ingredients into the oil and cocoa mixture, mixing together. Finally, add the beet and egg mixture mixing until well incorporated. Stop and marvel at the gorgeous color of this cake batter. Pour into greased and floured pans. Or, line the bottom of the pans with parchment paper. Bake cakes for 30-45 minutes or until toothpick comes out clean and top of cake springs back to the touch. (Try 18-20 minutes for cupcakes) Cook cakes in the pan for 10 minutes then turn out to a rack. Wait until completely cool to frost the cake.
For the Frosting:
(double this for a 3 layer cake)
1/4 pound butter
4 ounces cream cheese
1 teaspoon vanilla
1 cup powdered sugar
1/2 cup cocoa
Mix together butter and cream cheese until light and fluffy. Mix in vanilla. Sift together sugar and cocoa in a separate bowl. Add the sugar mixture to the butter mixture little by little until stiff. If needed, refrigerate to reach firmer consistency for frosting.
Tips:
-Cake layers freeze well if wrapped tightly.
-Beets can be made and pureed in advance and kept in the refrigerator a few days.
-Put a dab of frosting on your cake plate or stand to hold the cake in place while frosting.
No Tags

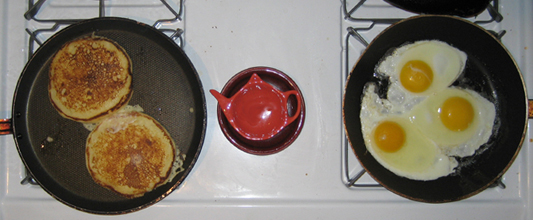
For some reason, I get such satisfaction out of eating a pancake breakfast for dinner. My husband and I always joke that we are “beating the system” when we sneak into a diner for dinner and order up a full pancake, egg and bacon meal. What system are we beating? Well I suppose we are thumbing our noses at whoever or whatever it is that determines what time of the day you are supposed to eat certain foods.
Often we follow a bad or exhausting day with breakfast. Who knows if it is the comforting food that helps or if we associate bright, sunny eggs and sweet maple syrup with a fresh start. At any rate, it makes us feel better.
A week or so ago, I found some additional buttermilk in my refrigerator, leftover from the Red Velvet Cake I baked the week before. In the same way that I will see any movie starring Bill Murray because I am pretty sure I will love it, I will try any new recipe that includes buttermilk. My Dutch mother-in-law drinks it straight and I admit that my love affair has not gone that far. But, I have yet to find a recipe with buttermilk that I do not like. One of my favorites is the buttermilk pancake recipe that a friend gave me a couple of years ago. It is so easy and so delicious, I have not used a pancake mix since then.
Give these a try some night and experience the childlike glee of eating breakfast for dinner.
Buttermilk Pancakes
2 cups flour
3 Tablespoons sugar
2 teaspoons baking soda
2 teaspoons baking powder
1/2 teaspoon salt
3 cups buttermilk
2 large eggs, lightly beaten
4 Tablespoons melted, unsalted butter
Mix flour, sugar, baking soda and powder and salt together. Stir in buttermilk and eggs then melted butter. Whisk together until combined. Cook pancakes in a hot pan with a little oil or butter to make the edges crispy.
These pancakes can be kept in the refrigerator for a few days and reheated. I usually toast them in a toaster oven the next morning and smear them with my favorite jam.

Rutabaga: Hi Ginger.
Ginger: Hi Rutabaga. How are you?
Rutabaga: Feeling kind of down. I am not very pretty.
Ginger: Me neither.
Rutabaga: I am not very social either. I think it’s because I spent most of my life with my head underground.
Ginger: Hey…. me too!
Rutabaga: Wow. Uh… want to have dinner together sometime?
In the last post, I challenged you all to buy and cook with something you have never tried before. My answer to the challenge was a virgin rutabaga purchase. I am sure I have eaten them at some time in my life but had never had one in my own kitchen. It is no surprise that they aren’t the most popular vegetable. They are sort of an awkward size, bigger than a grapefruit but smaller than a cantelope, and they aren’t much to look it. For all these reasons, it became all the more appealing to me so I could try to turn the ugly duckling into a swan!
I usually love mashed and pureed root vegetables so I decided to mash my first rutabaga. And, for some reason, perhaps I read it somewhere, it seemed like a good idea to put it together with ginger and orange. The ginger was sliced and placed in boiling water with peeled rutabaga chunks to give it a nice aroma. After draining the chunks of rutabaga and removing the ginger, I hand mashed them with olive oil and the juice of half an orange. Finally, the mash was liberally salted and peppered and placed under slices of broiled flank steak. (The steak was been rubbed with diced garlic and ginger and drizzled with olive oil.)

The steak was delicious. The rutabaga mash… um… well…I WANTED to love it. Really, I did. But, I suppose the truth is that not every food experience can be an epiphany. I liked the ginger and orange in the mash but I think it could have used some potatoes mixed in for consistency. In the end, I wish that rutabaga was as fun to eat as the word rutabaga is to say.
Should you decide to give rutabagas a try, these recipes look worth a go:
~Buttered Rutabaga with Herbs
~Rutabaga Apple Casserole
~a yummy looking soup
No Tags
I challenge all of you, especially the fellow food bloggers, to buy an ingredient you have never bought or cooked with before and try something new! There are so many foods, drinks, spices and herbs available to us these days. But, due to habit and time constraints we all get stuck in big old ruts. Look in the corners of the produce section for items you have never noticed. Visit ethnic grocers. Look on the bottom shelf for things that the mainstream never buys. To encourage us all to continue to explore, I think I will hold a new ingredient challenge monthly! (Because some cyclical behavior is comforting.)
I already have my first new item… I will let you know in a few days what it is, what I made with it and how it tastes. I will give you hint…it is from the produce section and I hope it tastes better than it looks.
No Tags
Would you rather have a personal chef for the rest of your life and never be allowed to cook again OR work full-time as a personal chef for the rest of your life?
Clarification: While working as a personal chef for others, you can also still cook for yourself as often as you like, it is just your full-time profession until natural retirement age.
This one is hard for me. I find so much pleasure in cooking and baking but like to do it when I am in the mood. I don’t think I could cook full time for others. But… to never cook again?!?! argh
No Tags

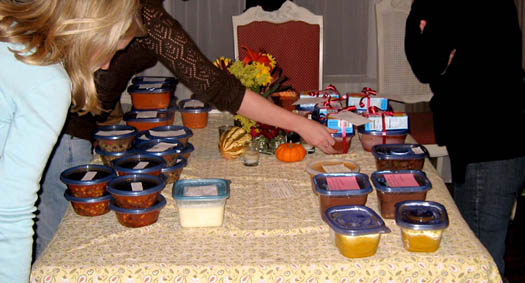
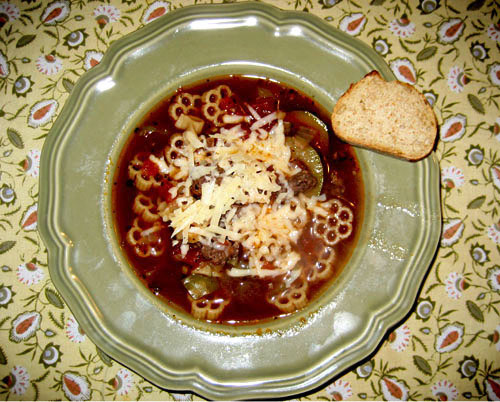
Soup is on the minds of many at this time of year. Here in Chicago, we are enduring temperatures well below freezing so it feels good to keep your hands wrapped around a warm cup or bowl as often as possible.
I love making soup but often get stuck in a rut with my same recipes. And, although leftovers are my favorite food group, I must admit that the third or fourth time into the same pot of soup to finish off the batch starts to make me lose enthusiasm for even the most delicious soups.
This winter, after talking to my mom about attending a holiday cookie exchange, I had the idea for a soup exchange - an event that embodied all of my favorite things: gathering with friends, eating together, talking about food and sharing food. I sent out an email calling all soup makers, we gathered, ate together and exchanged our soups. It was such a hit!
Here is how it worked:
I made a pot of soup to serve. Each guest (a wonderful mixed group of co-workers, old friends and neighbors) made soup and packaged it in 3 cup containers (about 2 servings). After we ate together and discussed our recipes, we gathered around the table to exchange soups. However many containers each person brought, she chose the equal number to bring home. It was such a success… we all felt giddy with excitement as we reloaded our bags with an arsenal of soup for our freezers.
It was a surprise to see how each participant’s personality showed in her soup offering. My considerate and crafty neighbor tied a box of Jiffy cornbread mix atop each of her chili containers. My talented co-worker who is a designer had beautiful labels on her curried pumpkin soup. My Parisian neighbor brought a delicious creamed cauliflower soup and a plate of the most delicious macaroons for dessert. (I like to believe her ability to make the best macaroons ever is partly due to genetics and her French blood.) For weeks after the exchange, on busy days when I had not thought about preparing dinner until I was starving, I opened my freezer and found my friendly containers of soup waiting to be discovered.
A few other helpful ideas for hosting a Soup Exchange:
- Use soup recipes that can be frozen. If the recipes call for pasta or fresh things that do not freeze well, leave it out and include instructions to add it when reheating.
- Include instructions for garnishes or ask guests to include copies of the entire recipe with each container.
No Tags

The soup that I served and exchanged at the inaugural Soup Exchange:
Italian Sausage Soup
1 1/2 lbs. Italian Sausage (I mix spicy and mild)
2 cloves garlic, minced
2 onions, diced
2 lbs. Italian seasoned diced tomatoes
1 1/2 cups red wine
5 cups beef broth
1/2 t basil
1/2 t oregano
2 medium zucchini, sliced
1 medium green pepper, chopped
2 cups noodles (I like wheels)
Salt and pepper
Fresh grated parmesan for garnish
Brown sausage in a soup pot. Drain it and set it aside. Saute garlic and onion in the same pan until onion is transparent. Add sausage back to pan along with tomatoes, herbs and broth. Simmer for 30 minutes. Bring to a low boil and add peppers, zucchini and pasta. Cook until pasta is al dente and vegetables are tender. Garnish with fresh parmesan.
No Tags

Red Velvet Cake is one of my all time favorite things. And, cakes are one of my favorite things to bake. But, until this weekend, I had never made a Red Velvet Cake. The reason is… it was just too emotional.
From the moment I was introduced to Red Velvet Cake and started talking about it, I realized it was one of those foods that is always under debate. What makes a true Red Velvet Cake? Who has the BEST recipe? If it isn’t the traditional Southern recipe, is it even Red Velvet Cake? I have seen many different recipes and it was too overwhelming to decide which to try.
The other emotional barricade to making my own Red Velvet Cake was that I just love it too much. I have a problem. When I love a certain food too much and I look forward to eating it and the recipe or flavor is disappointing, I get upset. I cry. No kidding. There are a few good stories here but I will not digress.
Inspired by this beautiful dessert, the need to bring something to a Super Bowl party and the impending Valentine’s Day holiday, I decided to saddle up this weekend, brace myself and bake my first Red Velvet Cake.
I started by searching the web and continued to find some serious debate here. I have to admit that when I saw a credible source write “Red Velvet Cake is nothing more than white or yellow cake with food coloring” I felt angry. Not just perturbed. Angry. What about the touch of cocoa, the buttermilk… vinegar?! Anyway, I like oil cakes over butter cakes usually so I started with a recipe, increased a few things… decreased a few things, added my favorite Cream Cheese Frosting and made a layer cake as well as a few cupcakes.
The result was really quite good, especially when I popped the first warm cupcake in my mouth which was oozing with warm, melting cream cheese frosting. It was not amazingly GREAT. But, I didn’t cry.
So, there are a few courses of action for the readers that I will propose:
1. If you don’t care that much about this cake, move on.
2. If you love Red Velvet Cake but don’t like to bake, mail order one from here. You will not be disappointed.
3. If you have this Red Velvet Cake thing figured out, send me your recipe!
4. If you are a baker, try this recipe and please send your honest criticism or praise.
Red Velvet Cake with Nutty Cream Cheese Frosting
2 1/4 cups flour
1 1/2 cups sugar
1 t baking soda
1 t salt
1/4 cup cocoa powder
1 1/3 cups vegetable oil
1 cup buttermilk, room temp
2 large eggs
2 T red food coloring
1 t white distilled vinegar
1 t vanilla
Preheat the oven to 350 degrees. Grease and flour 2 - 9 inch cake pans or make cupcakes. Sift flour, sugar, baking soda, slat and cocoa. In another bowl whisk oil, buttermilk, eggs, food coloring, vinegar and vanilla together until combined. Mix wet and dry ingredients together in a stand mixer with paddle attachment just until combined. Fill pans and bake about 30 minutes for cakes, 18-20 minutes for cupcakes or until toothpick comes out clean.
Nutty Cream Cheese Frosting
(this makes a lot of frosting - use half for cupcakes)
1 lb. cream cheese
4 cups sifted powdered sugar
2 sticks unsalted butter
1 t vanilla
1 1/2 cups chopped walnuts or pecans
Mix softened butter and cream cheese together until fluffy. Add powdered sugar little by little. Mix in vanilla and then fold in nuts by hand. Put frosting in refrigerator until stiff enough to frost the cakes.

This story starts out sad but ends happy and extremely delicious.
Last summer, one of my best and oldest friends was diagnosed with cancer at age 31. It was such an unbelievable shock and brought me to a realization that the older you get, the more likely you are to start getting deliveries of sad and scary news. I could still picture us at her 1st grade slumber party chasing her lost hamster and all of a sudden, we were discussing the best way to deal with her hair loss from chemo?! The small silver lining was that she received an outpouring of support from so many loved ones. My immediate reaction was to help, support and love her through food. So, I decided to bring dinner to her house every other week when she had her chemotherapy treatments. Doing this started a new type of cooking in my kitchen…thoughts of large batches and things that reheated well.
I have always wanted to use my crock pot more and this was the perfect opportunity. Inspired by a local bar with delicious BBQ Pork Sandwiches, I decided to give them a try. As I often do with new dishes, I looked up recipes and read them all once to get a sense of ingredients, then decided to wing it. I made the pork roast, shredded it and then…. smothered it with Open Pit BBQ sauce. Yes, I too use bottled sauces sometimes. The result was satisfying.
Later in the fall, I went for it again. Only this time, I bought Jack Daniel’s BBQ sauce and doctored it up with a secret ingredient. (I am trying to hook you to finish reading this long post… I will reveal the secret ingredient at the end.) Stacked high on a soft, white bun with a side of crunchy potato chips, the result was quite delicious.
The final stage of my BBQ Pork Sandwich journey came after a discussion with my friend Dave. He is somewhat of a new friend and over the past months, he has unpeeled like an onion, revealing layer upon layer of surprises. This guy can program computers, put together IKEA furniture with a blink of an eye, fix things just by looking at them and is a passionate cook. He is working on compiling his recipes on his new site, Forkestra. Dave not only convinced me that making my own BBQ sauce was well worth the effort but lent me his bottle of liquid smoke to give it a try. (Liquid smoke is worth a whole other post… I am so intrigued.)
Last weekend, I started with his recipe, replaced a few of the ingredients with my secret ingredient (still to be revealed) and drenched my shredded pork with the fragrant sauce. The result was absolutely, positively, mouthwatering, never-go-back-to-jar-except-in-a-pinch delicious!
So, at the end of this story, we find my friend cancer-free and healthy again, a new friend with great recipes, smoke in a bottle and a scrumptious sandwich. Told you it was a happy ending.
Pulled Pork Sandwiches with Homemade BBQ Sauce
Makes 4-6 large sandwiches
For the Pulled Pork:
Press about 8-10 whole cloves into a Pork Roast (mine was about 2 lbs.). Put it in a crock pot with a chopped onion. Add 1 1/2 - 2 cups beef broth so the roast is not quite submerged. Cook on high for about 4 hours or until the pork shreds easily with a fork. Remove the pork, take cloves out (they will be mushy), shred the pork with a fork.
The BBQ Sauce:
1 tbs Vegetable oil
1 small white onion, minced
2 medium garlic cloves, pressed
1/2 cup apple cider vinegar
1/2 cup Worcestershire sauce
1 Tbs yellow mustard
1 tsp Kosher salt
1 tsp Natural liquid hickory smoke
2 Tbs Moosewood Hollow Sweet Heat (The secret ingredient! Maple syrup infused with habanero peppers)
Ground black pepper, to taste
1 1/2 cups ketchup
Heat oil in a 1qt pan. Add onion and garlic and saute until softened, about 5 min. Add (excluding ketchup) remaining ingredients and bring to a boil. Reduce heat to low, add ketchup and simmer until thickened and caramelized, stirring often, about 45-60 minutes.
Sauce on the meat, meat on a bun, eat with baked beans, chips, coleslaw… you can figure out the rest.
No Tags