Caroline

Caroline, Chicago, IL
A cornfed, Midwestern girl writing about food, drink and the things I can't get out of my head. More

Top 5 Recipes
Would You Rather?
FOOD BLOG SEARCH

header photo courtesy of my friend mav

RECIPES
Breads & Breakfast
Buttermilk Love
Desserts & Sweets
Drinks & Appetizers
Greek Favorites
Main Dish
Sides & Snacks
Soups & Salads
CONVERSATION
Discussions & Ideas
Food Experiences
Would you Rather?
AROUND THE TABLE
Food Finds by City
Tableware & Tools
Uncategorized
FAVORITE CLICKS

Daily Food Reads
Cakespy
Ceres and Bacchus
Coconut & Lime
Counter Intelligence
Delicious Days
Everybody Likes Sandwiches
Forkestra
H.O.G. Food Blog
Homesick Texan
Kitchen Unplugged
Lobstersquad
Nordljus
Orangette
Perfect Pantry
Pinch My Salt
Probono Baker
Slow Like Honey
Sugar and Lard
Under the High Chair
Wednesday Chef
Yumbrosia

Pretty Things
  • 3191
  • Breathe Upon
  • decor8
  • Montmartre's Sketchbook
  • Nebo Peklo
  • Perpetual State
  • Port2port Press
  • Swallowfield

  • Treat Yourself
  • Vosges Haut-Chocolat
  • Zingerman's

  • Other Favorites
  • Live from APT
  • January 29th, 2008 | 6 Comments »

    billysbakery.jpg
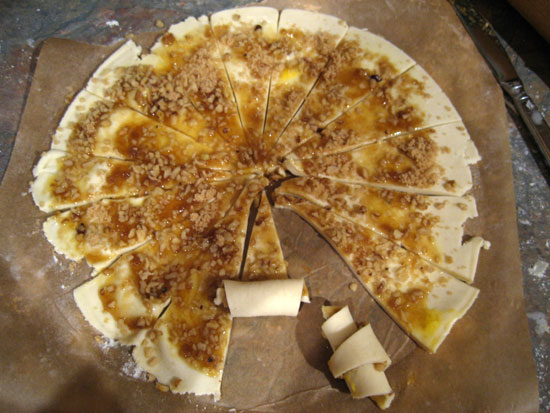
    Thank you friends for all your comments and conversation about the Rugalech. Let’s keep talking baked goods, shall we?

    This past summer, while in New York City, I made my first pilgrimage to Magnolia Bakery. I went at night, waited around the corner and then gave into my hoarding instincts and grabbed cupcakes madly to fill my box. If you were reading back then, you will remember my report was less than enthusiastic.

    During my more recent trip to the Big Apple, I followed the advice of friends and visited Billy’s Bakery. We ordered a sampling including Red Velvet Cake (one of my all time favorite things), Banana Cake and a few different cupcakes.

    The decor was quaint and cute, the staff more friendly than Magnolia’s and the line shorter. And now I tiptoe to my true opinion…I didn’t love the cakes. Eeeek… can little midwestern girl truly turn her nose up at two of the most popular bakeries in New York City?! The cakes were nice and pretty but all were quite dry. Perhaps I am so spoiled by fresh cake out of the oven that I am not realistic about bakery case cake. Maybe I just ordered the wrong thing… some friends later told me the Ice Box Cake was the way to go or even a slice of pie. Finally, I might be realizing that I prefer desserts that are not too sweet and the icings at bakeries are often sugary as can be.

    Excuses, excuses. Anyway, I just really wanted to love Billy’s Bakery and I do suggest you swing by if you are in the neighborhood. There is a good chance it isn’t the bakery… it might just be me.

    p.s. Speaking of Red Velvet Cake, it may be time to bake one up with Valentine’s Day on its way. (Seems like a good time to eat red cake.) I think I will revisit this Red Velvet Cake recipe, which i haven’t made since last year.

    January 27th, 2008 | 13 Comments »

    rugalech.jpg

    I made and ate an enormous amount of cookies in December. However, a mere month later, I am back in the saddle and ready to bake… and overeat…. more cookies. I still a have half a dozen restaurant and bakery recommendations to share with all of you from my New York trip but it seemed better to start out the week on Whipped with a comforting recipe for something delectable.

    Often, I proclaim my everlasting love for buttermilk, my most favorite ingredient. However, I have decided that cream cheese is a close second. My taste buds cheer for almost everything made with cream cheese - cookie doughs with cream cheese, pastries filled with cream cheese, brownies swirled with cream cheese, taco dips layered with cream cheese…. the list goes on.

    These cookies were so fun to make, ultra tasty and really pretty.

    Walnut and Brown-Sugar Rugelach
    From Everyday Food, December 2007

    1 cup (2 sticks) unsalted butter, room temperature
    1 bar (8 ounces) cream cheese, room temperature
    2 T granulated sugar
    1/2 teaspoon salt
    2 cups all-purpose flour, plus more for rolling
    1 large egg, lightly beaten
    1 cup walnuts, finely chopped
    1/2 cup packed light-brown sugar

    In food processor, blend butter, cream cheese, granulated sugar, and salt until well combined. Add flour and pulse just until dough forms. Divide dough in half; flatten into disks, and wrpa each in plastic. Refrigerate until firm, at least 2 hours and up to 2 days, or freeze up to 3 months. (always thaw before baking).

    Preheat oven to 350 degrees, with racks on upper half and lower thirds. Line two baking sheets iwth parchment paper and set aside. In small bowl, combine egg with 1 teaspoon water and make an egg wash.

    Working with one disk at a time, place dough on lightly floured parchment paper and roll out into an 11inch circle (about 1/4 inch thick) dusting with flour lightly as needed. Using a large dinner plate as a guide, cut around dough to make a perfect circle. Trim off excess and discard scraps. Bruch circles with egg wash, dividing evenly, sprinkle with walnuts and brown sugar.

    Using a sharp knife or pizza cutter, cut each circle into 16 equal triangles. Starting from wide end, roll up each triangle of douhg. Place on lined baking sheets, seam side down. Bruch rolls with egg wash.

    Bake until golden brown, 30 to 32 minutes. Transfer rugelach to a wire rack to cool completely.

    Variation: With some of the dough, I skipped the egg wash, walnuts and brown sugar and used raspberry preserves instead. When they came out of the oven, I sprinkled them with powdered sugar and they were fantastic!

    January 25th, 2008 | 3 Comments »

    cafehenri.jpg
    Last weekend, we ate our way through New York City. During our three day jaunt, we did not end up visiting a single museum, seeing a show or hearing live music. I did however put a number of things in my mouth that were some of the best flavors and food experiences of my life. Just the memories, as I sit here late at night thinking about it, make me shudder.

    Amazing food brings me such joy and excitement, I almost wonder if I have a problem. Spending time with my husband, who happens to be my number one comrade, and discovering small, quaint restaurants and bakeries, perusing the menus and sinking our teeth into one delicacy after another makes me happier than just about anything.

    I have decided to start a new category on Whipped called Food Finds by City for others who may be traveling and enjoy recommendations. In the coming days, I will start by sharing my recent New York City favorites.

    The photo above is the image of my dream breakfast. Cafe Henri is a small, ten table restaurant that features crepes and other brunch dishes. I enjoyed the scrambled eggs, which were certainly made with cream and the perfect balance between fluffy and solid…moist but not wet. On the side you will see my bacon, potatoes, small salad and fresh bread with homemade peach preserves. Even the cappuccino was perfection and arrived with a mountain of foam akin to an angel’s cloud. My husband ordered the nutella and banana crepe. After it arrived, I only saw the top of his head for about three minutes and his plate was clean. So, I gather it was equally as memorable.

    Cafe Henri
    27 Bedford St (between Carmine & Downing in the West Village)
    New York, NY 10014
    212.243.2846

    January 22nd, 2008 | 5 Comments »

    misosoup.jpg
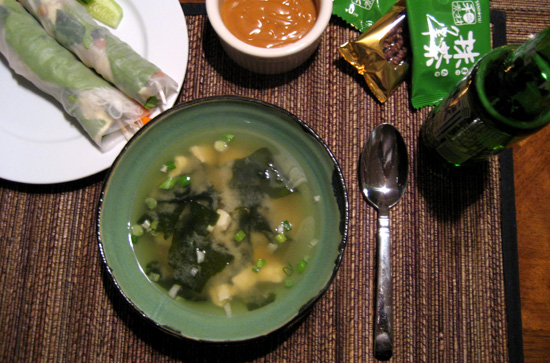
    Last week, I was delighted with a special treat. My assistant and friend, Sophie, assembled for me a fresh “make your own miso soup” kit. She had traveled to a massive Asian grocer in the Chicago suburbs with someone who guided her through the store and the foreign ingredients. Sophie purchased everything needed for Miso Soup, including fresh tofu (mmm… so silky, so smooth!), seaweed, and miso paste with dashi stock. She kindly delivered my personal miso kit in a petite tower of plastic containers with her handwritten instructions tied atop.

    Despite her promise of ease, I was a bit intimidated. I don’t know why. Having sipped miso soup in many restaurants, it clearly does not involve too many ingredients. Still, it was all new to my kitchen. I found what Sophie promised was true - it is so easy to make and I discovered a fun, surprise element of the process. The seaweed she gave me was dried and each piece was about as big as a pencil eraser. Upon hitting the boiling water… poof!..it exploded into a full square of soft seaweed. I almost squealed with delight. It reminded me of those little capsules you get as a kid that go in your bath and turn into shaped sponges in minutes!

    If you have an Asian grocer nearby - don’t be scared - truly, it really is so easy! Try this easy spring roll recipe while you are at it. And, to congratulate yourself on a fancy Asian meal, sip a lychee martini while pulling it all together.

    p.s. In the upper corner of the photo, you will see the Green Tea cookies and almond Pokey sticks Sophie also gave me. mmmm.. the perfect sweet, crunchy treats to top off the meal.

    Miso Soup
    3 1/3 cups water
    1- 1/2 oz. dried seaweed
    4 Tbsp miso paste with dashi stock
    Tofu, diced in small squares

    Boil the water. Add seaweed (a little at a time to your desired amount) and boil for 2-3 minutes. Turn off heat and gently dissolve the miso paste in the water. Reheat the soup and add tofu (as much or as little as you like). Turn off heat as soon as water starts to boil and serve hot.

    January 18th, 2008 | 8 Comments »

    cornchowd1.jpg

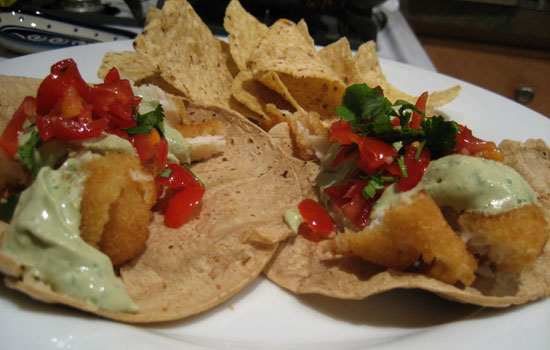
    My experience with this new recipe was like a first date you initially feel nonchalent about. But, as the evening unfolds, you are pleasantly surprised and find yourself in a giddy tizzy.

    I love all things corn and almost always enjoy a good bowl of corn chowder. Knowing I wanted a hearty soup to enjoy with my fresh loaf of Rosemary Walnut Bread, I set about on an internet recipe search. Seeing both ham and chicken versions of corn chowder, I opted for one of the chicken recipes only because it seemed like a more health conscious choice. Upon opening a recipe titled ‘Chicken Corn Chowder’, found on Epicurious, my pleasant suprises began to unfold.

    The top item in the ingredient list of this “Chicken” Corn Chowder recipe was slices of bacon. oooh, I like your style. You aren’t quite what I expected. Initially frying the bacon in your soup pot and removing it creates an amazing base for sauteing the onions and peppers. smooth introduction, this date could be better than I thought. Instead of just using the potatoes usually found in chowder, the recipe also includes chunks of butternut squash and red or orange peppers. my, my you are more handsome than I expected. Since I had limited time to make the soup, I was even more excited to learn that it included pre-cooked rotisserie chicken from the grocery store and a bag of frozen corn. you are making this just too easy for me to say yes… The green onions and cilantro thrown in at the end add a fresh flavor and color to the already vibrant vegetable confetti. you sure are different than all the others. I made some adjustments to the recipe and have posted my final version below. see you again some time? giggle giggle…I would love to…

    Chicken Corn Chowder
    Adapted from Bon Appétit, October 2003

    Ingredients
    5 bacon slices, chopped
    1 tablespoon butter
    1 medium onion, chopped
    1 cup chopped red or orange bell peppers (about 1 large)
    1/4 cup all purpose flour
    6 cups low-salt chicken broth
    2 cups 1/2-inch cubes peeled seeded butternut squash
    1 extra large or 2 medium russet potatoes, peeled, cut into 1/2-inch cubes
    1 1/2 tablespoons chopped fresh thyme
    1 16-ounce bag frozen corn kernels
    1 cup whole milk
    1 cup diced skinned roast chicken (1/2 the rotisserie chicken)
    1/2 plus 1/4 cup chopped green onions
    1/2 cup plus 2 tablespoons chopped fresh cilantro
    salt & pepper

    Cook bacon in large pot over medium-high heat until crisp. Using slotted spoon, transfer bacon to paper towels to drain. Pour off all but 1/4 cup drippings from pot. Add butter to pot; melt over medium-high heat. Add onions and 1/2 cup of bell peppers. Sauté until onions are soft, about 10 minutes. Add flour; stir 2 minutes. Mix in broth, then squash, potatoes, and thyme; bring to boil. Reduce heat to medium-low; simmer uncovered until squash and potatoes are tender, about 12 minutes. Add corn, milk, and 1/2 cup bell peppers. Simmer until corn is tender, about 10 minutes. Add chicken, 1/2 cup green onions, and 1/2 cup cilantro; simmer 5 minutes. Season with salt and pepper.

    Ladle chowder into bowls; sprinkle with remaining green onions and cilantro.

    January 14th, 2008 | 12 Comments »

    rosewalnutbread.jpg

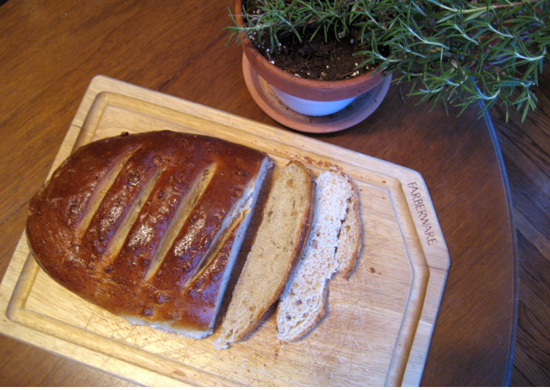
    Yesterday, I spent most of the day at home doing things around the house. All the time at home encouraged me to make some homemade bread. It really is not too much work as long as you are around and available to “punch down” and knead when needed. I took a little nap on the couch while the bread was in the oven and awoke to the most glorious of smells permeating the house… fresh baked bread with a hint of rosemary. It was aromatherapy for the soul!

    The reason I say homemade bread is “not too much work” is thanks to the kitchen tool that has most changed my life in the past few years - my Kitchen Aid bread hook. There is nothing else that has brought so much ease to an otherwise sticky and messy process. For many of you, perhaps hand kneading the bread is half the fun. For me, I might do it once a year but usually do not feel like getting my hands and counter sticky and dirty and cranking on the bread dough for 10-15 minutes. Enter bread hook… flip the switch and leave the room for 10 minutes. Return and bread dough is ready for rising.

    I am curious… to all you cooks and bakers out there… what is the kitchen tool that has most changed your life in the past year or two? Do tell…

    Rosemary Walnut Bread
    adapted from Cooking Light

    2 cups warm 1% low fat milk (100-110 degrees)
    1/4 cup warm water ( (100-110 degrees)
    3 tablespoons sugar
    2 tablespoons butter, melted
    2 1/2 teaspoons salt
    2 packages dry yeast (about 4 1/2 teaspoons)
    5 1/2 cups all purpose flour, divided
    1 cup chopped walnuts
    3 tablespoons coarsely chopped fresh rosemary
    1 large egg, lightly beaten
    1 tablespoon olive oil
    1-2 tablespoons yellow cornmeal
    1 tablespoon 1 % low-fat milk
    1 large egg, lightly beaten

    Combine first 5 ingredients in a large bowl, stirring with a whisk. Add yeast and stir. Let stand 5 minutes. Add 2 cups flour to yeast mixture, stirring with a whisk. Cover and let rise in a warm place (85 degrees) free from drafts, 15 minutes.

    Add 2 1/2 cups flour, walnuts, rosemary and 1 egg, stirring with a whisk. Knead dough until smooth and elastic (at least 10 min), adding enough of reamaining flour 1/4 cup at a time to prevent dough from sticking to hands. Place dough in a large bowl and drizzle with olive oil, turning to coat. Cover and let rise 1 hour in a warm place free from drafts for 1 hour or until doubled in size. (lightly pressing two fingers in dough, indentation should remain when dough has risen enough)

    Preheat oven to 400 degrees. Punch dough down and turn onto floured surface. Divide dough in half and make two rounds or loaves. Sprinkle baking sheet or pizza stone with cornmeal and top with loaves. Cover and let stand 30 minutes or until doubled in size.

    Combine milk and beaten egg. Brush top of loaves. Make diagonal cuts across top of loaves with a knife for decoration if you wish. Place loaves in oven, reduce temperature to 375 degrees and bake 40 minutes or until bottom of each loaf sounds hollow when tapped. Let stand 20 minutes before slicing.

    January 11th, 2008 | 5 Comments »

    caulleeksoup.jpg
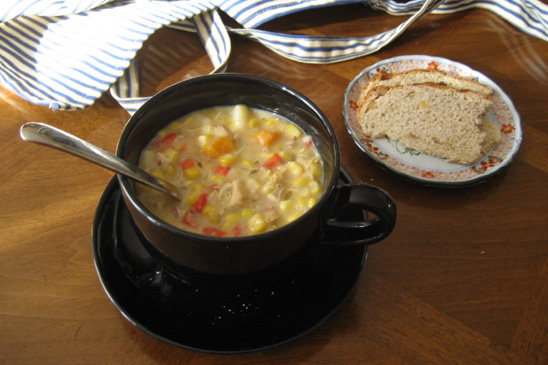
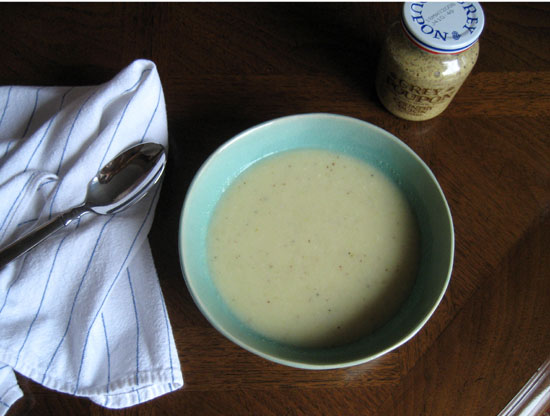
    Cauliflower is a rediscovered vegetable in my life. As a child, my mom mixed it with broccoli and covered it with cheese sauce. I don’t remember particularly liking or not liking it but I do know that the cheese sauce made it an edible vegetable. Because my husband isn’t a fan, I just never thought to buy cauliflower and make anything with it.

    Thanks again to my weekly produce delivery, our horizons have been broadened. My leek from last week’s box and the small, dainty head of cauliflower from this week’s box seemed to make friends in the crisper drawer so I decided to let them stay together.

    I glanced at a few cauliflower leek soups online and threw together a basic pureed soup. It was flavorful but I wanted to add a little something and due to my lack of familiarity with cooking this vegetable, I wasn’t sure what. Just then, a little synapse fired and my memory brought to me a hazy vision of roasted cauliflower with mustard vinaigrette, which was enjoyed and reported by the super-star blogger Molly.

    Mustard seemed like just what the soup could use. A spoon of ol’ Grey Poupon and some coarsely ground pepper spiced it up enough to stimulate my taste buds without covering up the subtle and delicious cauliflower-leek flavors. Although I didn’t have time or ingredients to make it, I think this would be delicious with a brie and pear panini or brie and green apple sandwich on a crusty white bread.

    Cauliflower Leek Soup with Mustard

    1 leek
    3 Tablespoons butter
    1 clove garlic, crushed
    1 head cauliflower
    4 cups vegetable or chicken broth
    1/2 cup cream or milk
    1 teaspoon stone ground mustard
    salt
    coarsely ground pepper

    Chop off unusable green ends of leek. Cut in half and chop the leek. Melt butter in a soup pan. Add the leek and garlic and cook about 3 minutes until fragrant and slightly transparent. Cut cauliflower in small chunks and add to the pan, stirring for 1 minute. Add the broth. Bring to a boil and then reduce to a simmer and cook until cauliflower is very tender but not mushy (15-20 minutes). Turn off heat and let cool slightly. Use an immersion blendor or a regular blender to puree the soup. I keep mine with a few chunks for some texture. Stir in cream or milk. Add mustard, salt and pepper adjusting as you like for taste.

    January 6th, 2008 | 8 Comments »

    fishtacos.jpg
    Since the holidays, I have been working my way through my pantry and freezer trying not to be picky about what I eat and keeping it simple while cleaning things out a bit. I had a few breaded cod filets from Trader Joe’s tucked in the freezer, which I have on hand for a quick meal now and then. I WANT to be someone with the time to make something wonderful, fresh and fancy every night but the occasional 50-60 hour work week doesn’t always allow for a gourmet chef reality.

    When I first became acquainted with Hands On Gourmet in San Francisco, I attended one of their hands-on cooking events where their guests cooked up Fish Tacos with Latin Slaw and Avocado Crema. Chef Stephen never cuts corners so of course they made their own beer batter from scratch for the fried fish and even pressed fresh, handmade tortillas. Inspired by those memorable tacos, I developed my own 20 minute version using the fish in my freezer. For a weeknight quickie, it was more than satisfying.

    Super Easy Fish Tacos with Avocado Cream
    6 corn or flour tortillas
    4 frozen fish filets (or use any fish fresh or frozen)

    For the Avocado Cream:
    1 ripe avocado
    1/2 cup sour cream
    1/4 cup fresh cilantro leaves
    juice of 1/2 lime
    salt to taste (a few good pinches)

    Your Favorite Salsa OR
    1 tomato diced
    1 clove garlic minced
    1 shallot or 1/8 cup onion chopped
    chopped fresh cilantro

    Cook fish filets according to package directions. While it is in the oven, put all the ingredients for the avocado cream in a blender and pulse until smooth. If making your own salsa, mix the tomato, garlic, onion and cilantro in a dish. Heat a skillet and warm tortillas on each side for a minute or so until supple. Cut up the fish and place it on the tortillas. Top each with a healthy dollop of avocado cream and salsa. mmmmm

    January 1st, 2008 | 5 Comments »

    bananabread.jpg

    Not only is my lovely friend Stephanie beautiful, intelligent and talented enough to design gorgeous silk handbags, scarves and other accessories, she also bakes the best banana bread I have ever had. A few years ago, she shared the recipe with me but it wasn’t until today, on the first day of 2008, that I baked up a loaf that I think was just about as good as hers.

    I have an aversion to baking with shortening so I was pleased to find her recipe used good old-fashioned butter. I know some bakers say that the trans fats in shortening are the key to great baked goods but something about that white stuff creeps me out a little. This is also the first recipe that I have followed where the butter is melted and then added at the end instead of whipped in at the beginning.

    Since I have made this many times and just finally got it right, I have included my tips and tricks below. I have to say, these slices were about as perfect as banana bread gets. Washed down with a glass of milk, it started my year out right. I suggest you start rotting some bananas and get baking!

    Banana Bread

    1 1/2 cup all purpose flour
    1 teaspoon baking soda
    1/2 teaspoon salt
    1 cup white sugar
    2 eggs, lightly beaten
    3 large, ripe bananas, mashed
    1/4 cup butter, melted

    Grease and flour loaf pans. The original recipe called for two 7 x 3 inch loaf pans but Steph prefers four mini loaf pans. Preheat oven to 350 degrees.

    In a bowl, whisk together flour, soda, salt and sugar. Mix in the slightly beaten eggs and mashed bananas. Slowly stir in the melted butter just until incorporated. Pour into prepared pans. Bake at 350 for 45-50 minutes or until a toothpick comes out clean from the center. If you use the mini loaf pans, adjust to about 30 minutes. Just take a peek and if the top is starting to brown and looks cooked, try the toothpick to test for doneness. Let cool in pans for 5 minutes then turn out onto a rack to cool completely.

    Additional Thoughts:
    - Banana size varies drastically. Today I used the largest I have used in the past and the bread was so moist and flavorful. If you have really small bananas, add an extra half.
    - What is a ripe banana? Well, I like mine almost all brown with some specs of yellow. Once I used all brown and it smelled a bit like alcohol. I think they were fermenting and on their way to banana liqueur :)
    - Mash bananas well with a potato masher or fork but leave some small chunks. Don’t go all the way to baby food consistency.
    - Do NOT over mix this batter. I would not use an electric mixer - just a few circles of the wrist while incorporating the ingredients.
    - Do NOT overbake. The moist, banana-y center should be soft and crumbly.
    - Let the bread cool completely before storing. The edges and outside will get sticky and icky if you wrap it or put it in a ziploc too soon.

    Click here for other general baking tips,.


    FireStats iconPowered by FireStats