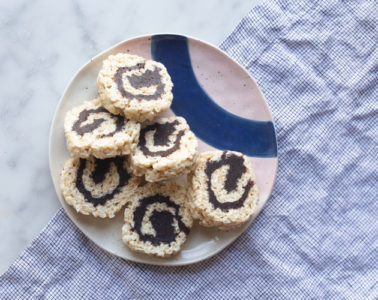
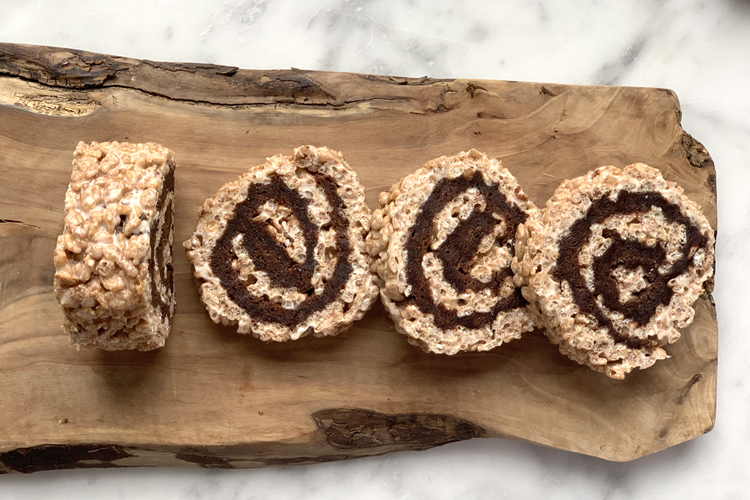
Whipped. Food, Drink And Conversation From Around The Table

Sponsors
For info on Whipped ads, click here
Snow & Graham

Stroller Traffic

February 8th, 2010 | 4 Comments »

oatmeal-steelcut

I prefer hearty, steel cut oats to old-fashioned oats but I don’t prefer them enough to launch a 45 minute cooking endeavor in the morning.  Some things require a good short cut.  And, I have found one.  The guys at The Bitten Word suggested a little “night before” prep followed by only 10 minutes of cooking in the morning.   It worked!

I then got greedy and tried to find an even EASIER method.  Some say that a rice-cooker is fool proof for almost any grain. Wake up, put the water and oats in, go take a shower while oats cook.  Unfortunately, I came down this morning to find a gloppy, sloppy mess on my counter from a rice-cooker, bubble over mishap.  It may have been the small size of my rice-cooker that was to blame but the oats were still a little too chewy and the bottom layer of oats was stuck on the rice-cooker creating additional ugly clean up.  I’ll stick to the overnight soak.

Toppings?  I went with freshly toasted almonds, cranberries and maple syrup. Maybe it doesn’t make a lot of sense that I am NOT willing to wait 45 minutes for oats to cook but I AM willing to take the time to toast almonds first thing in the morning.  If you have a toaster oven, put the chopped almonds on the mini baking sheet and toast them.  Added benefit: Your house will smell amazing.  The mixed aromas of fresh brewed coffee and toasted almonds are aromatherapy for a winter morning.

Overnight Oatmeal with Almonds and Dried Cranberries

Food & Wine
Makes 6 Servings

1 1/2 cups steel-cut oats
6 cups water
1/4 cup chopped salted roasted almonds
1/4 cup dried cranberries
Brown sugar or pure maple syrup, for serving

In a large saucepan, boil the oats in the water for 1 minute. Cover and let stand overnight at room temperature. The next day, uncover the oats and bring to a boil over high heat. Reduce the heat to low and simmer, stirring frequently, until the oatmeal is cooked and creamy but still a little bit chewy, about 10 minutes. Spoon the oatmeal into bowls. Top with the chopped almonds and dried cranberries and sweeten to taste with brown sugar or pure maple syrup.

The prepared oatmeal can be refrigerated for up to 1 week. Rewarm in a microwave oven and thin with water if necessary before serving.

No Tags
Categories: Breads & Breakfast | Link to this post
Share it: del.icio.us • digg • reddit • stumble upon
February 2nd, 2010 | 13 Comments »

red-velvet-cupcake

I have been dancing the tango with Red Velvet Cake for some years now.  Just when I think I can turn my face away and retire my quest for the perfect recipe, the scarlet vixen has me pressed to her cheek striding across the dance floor once again.

Our love affair is always reignited in the month of February.  The marketing machines of the world are pressing Valentine’s Day upon us and my palate cannot resist cupid’s arrow.  Festive, moist, red cake topped with classic cream cheese frosting… I am dazed with desire.

What is it about Red Velvet Cake that has captured my heart?  Well, even more than most cakes, there is an element of chemistry that makes this cake right.  That magical mixture of baking soda and vinegar gives me a mad-scientist high.  Second, this cake plays hard to get.  Recipes vary greatly and have often disappointed only fueling my longing to test, try, bake and separate the good from the bad.

This year’s Red Velvet Cake recipe comes from my sister.  If you have been reading my blog long, you will know she is the source of many of my winners.  I don’t usually favor the use of shortening and full bottles of food coloring in my baking.  But, as with everyone that we love, we make exceptions for the smallest incompatibilities.

Red Velvet Cake

Makes about 24 cupcakes or one 9-inch layer cake.

2 tablespoons unsweetened cocoa powder
2 ounces red food coloring
1 cup buttermilk
1 teaspoon salt
1 teaspoon vanilla extract
1/2 cup shortening
1 1/2 cups white sugar
2 eggs
2 1/2 cups all-purpose flour, sifted
1 1/2 teaspoons baking soda
1 teaspoon white vinegar

Grease two 9 inch round pans or line muffin pans with paper liners for cupcakes (makes approx. 2 doz.) Preheat oven to 350 degrees. Make a paste of cocoa and food coloring. Set aside.

Combine the buttermilk, salt and 1 teaspoon vanilla. Set aside. In a large bowl, cream together the shortening and 1 1/2 cups sugar until light and fluffy. Beat in the eggs one at a time, then stir in the cocoa mixture. Beat in the buttermilk mixture alternately with the flour, mixing just until incorporated. Stir together baking soda and vinegar, then gently fold into the cake batter.

Pour batter into prepared pans. Bake in the preheated oven for 30 minutes, or until a toothpick inserted into the center of the cake comes out clean. Allow to cool completely before frosting.

* For cupcakes, fill each liner approximately 2/3 full. Bake 15 – 20 minutes.

Cream Cheese Frosting

1 lb. cream cheese, softened
2 sticks butter, softened
4 cups powdered sugar
1 tsp. vanilla

Mix cream cheese and butter and sugar until fluffy; about 5 minutes. Add vanilla

No Tags
Categories: Buttermilk Love, Desserts & Sweets | Link to this post
Share it: del.icio.us • digg • reddit • stumble upon
January 25th, 2010 | 17 Comments »

lasagna-white-vegetarian

I am lucky in that many of my clients have become good friends. It makes for especially enjoyable client entertaining. During the holidays, I invited my pals from Revel along with my talented photographer friend for a dinner party. (side note: check out this yummy website I was lucky enough to help them with) Since one of the guests is a vegetarian, I decided to broaden my horizons and comprise a three-course vegetarian meal.

Deer in headlights.

How could I not have presentable vegetarian recipes in my dinner party repertoire?! I am a Midwestern girl born and bred on meat and potatoes married to a Greek who eats lamb on a spit but still, not one pretty, make-ahead main dish?! Disgusted by my limited range, I set out to devise a delicious vegetarian spread.

This vegetarian lasagna was the result of hours of internet searching and piecing together of tips and tricks from here and there. White vegetarian lasagna can be flavorless. I overcame that by infusing the milk with garlic before making the bechamel sauce and with very fresh organic vegetables and high quality Parmesan cheese.

The first course was a roasted tomato soup which was basically this sauce pureed with some vegetable stock.  I loved the contrast of starting with red tomato soup and then serving a lasagna without any. We ended the meal with these brownies.

This dish took about an hour to prepare and assemble but I made it ahead and put it back in the oven to reheat and it turned out very well. This recipe is not as “wet” as many lasagna recipes because I wanted it to stand pretty on the plate. The first notch in my vegetarian-dinner-party-recipes belt!

White Vegetarian Lasagna
Makes 8-10 servings

1 package thin, no-cook lasagna noodles
2 1/2 cups whole milk
1 cup vegetable broth
6 cloves garlic, cut in quarters
3 Tablespoons butter
5 Tablespoons flour
1 cup quality Parmesan cheese, grated
1/2 teaspoon nutmeg
Pepper and Salt
4 Tablespoons olive oil
1 large zucchini, cut in 1/4 inch slices
1 summer squash, cut in 1/4 inch slices
1 bag of baby spinach
4 oz (about 1 cup) sliced mushrooms
1 small yellow onion, diced

Place the no-cook noodles in hot water and set aside to soften. Be careful that they don’t stick to each other. Heat milk and vegetable broth in a sauce pan until simmering. Add the garlic, cover and remove from heat. Let stand for at least 10 minutes.

To prepare for the layering of the vegetables, I sauteed each one by one and then put them in bowls to create a mise en place for easy assembly. Heat 1 Tablespoon of olive oil in a skillet. Add the zucchini and saute a few minutes, turning with a spatula until al dente. Remove from pan. Add another tablespoon of oil and saute the summer squash in the same way. If needed, add additional olive oil and then spinach. Toss with a spatula until just slightly wilted. Remove from pan. Finally, add additional oil if needed and add onion and mushroom cooking for just a few minutes.

Remove the garlic pieces from the milk and broth mixture with a slotted spoon. In another sauce pan, melt butter. When melted, whisk in the flour. Slowly whisk the garlic-infused milk mixture into the roux. Cook, stirring frequently, until the sauce thickens. Remove from heat and stir in nutmeg and salt and pepper to taste. (Don’t be shy with the salt, I think it usually needs about a few teaspoons)

Assembly time! I used a 10 inch square pan but a 9 x 13 should also work. Spread about 1/2 cup of sauce over the bottom of the pan. Place a layer of noodles on the bottom. Spread the zucchini over the layer of noodles. Drizzle about 1 cup of sauce over it. Add another layer of noodles. Add the mushroom and onion mixture and 1/3 cup of the Parmesan cheese. Add the next layer of noodles. Add the spinach and 1 cup of white sauce. Another layer of noodles. Finally, the spinach layer and 1/3 cup of Parmesan. Top with a final layer of noodles, the rest of the sauce and a sprinkling of the remaining 1/3 cup of cheese.

Cover pan with foil and bake at 350 degrees for about 25 minutes. Remove foil and bake another 10 or 15 minutes until top is browned. Let cool before slicing and serving. If you are making ahead, decrease cooking time by 15 minutes and reheat in the oven before serving.

No Tags
Categories: Main Dish | Link to this post
Share it: del.icio.us • digg • reddit • stumble upon
January 20th, 2010 | 13 Comments »

bran-muffin-bobsmill

My bran muffin kick continues. While preparing a “mise en place” of muffin ingredients on Sunday evenings, I calmly consider the week ahead and before any anticipation of stress takes over, I happily remember that I will inaugurate the workweek with a healthy, warm baked good.

I found this recipe on the back of my Bob’s Red Mill Wheat Bran package. I was drawn to it for its list of natural ingredients and lack of processed and refined items. Together, these ingredients produced a pretty solid muffin. After my first bite, I was hesitant and worried that they were a bit too dense but both my husband and Mini Whipped showed immediate approval. The little tyke had such continued enthusiasm for these muffins that it made for a difficult photo shoot:

bran-muffin-vivi

Molasses Bran Muffins
From Bob’s Red Mill

1 cup Wheat Bran
1 1/2 cups Whole Wheat Flour
1/2 cup Raisins (Unsulfured)
1 tsp. Baking Powder
1 tsp. Baking Soda
1 cup Milk
1/2 cup Molasses (or Honey)
3/4 cup Applesauce
1/4 cup chopped Nuts (optional)
2 Tbsp. Oil
2 Eggs, beaten

Preheat oven to 400°F. Combine wheat bran, flour, baking soda and baking powder. Stir in nuts and raisins. In a separate bowl, blend applesauce, milk, molasses, oil and egg. Add to dry ingredients and stir just until moistened. Spoon into greased muffin tin (or paper muffin cups) and bake for 15-20 minutes. Makes 12 marvelous muffins.

Nutritional Information:
Serving Size: 1 Muffin
Calories 180, Calories from Fat 50, Total Fat 6g, Saturated Fat 1g, Cholesterol 35mg, Sodium 180mg, Total Carbohydrates 32g, Dietary Fiber 4g, Sugars 14g, Protein 5g.

No Tags
Categories: Breads & Breakfast | Link to this post
Share it: del.icio.us • digg • reddit • stumble upon
January 16th, 2010 | 7 Comments »

jicama-slaw

Jicama is not something that is usually on my radar. I’ve eaten it before but just never think to buy it. A friend suggested some sort of a jicama slaw to go with steak tacos she was making and in development of this side dish, I was reminded what a soft spot I have for this colorless, homely vegetable.

With a quick internet search, I learned that this watery, slightly sweet root vegetable is native to the Americas. Interestingly, the vine that grows from this root is poisonous! The jicama flavor is starchy but fresh. The texture is crunchy but moist, a bit like a water chestnut. The aroma is slightly reminiscent of green apple and tastes amazing with a squeeze of lime. Overall, I feel like this edible treat got gypped with its colorless, humble form. It is so much more interesting and refreshing than it looks. Just think if a jicama looked as sexy as a strawberry how many more shopping carts it would find.

Since I was in a bit of a pinch for time, I made the pictured batch by shredding the ingredients in a food processor. For my smaller, second batch, I took the time to julienne the jicama and carrots and much preferred it that way. As a final note, I found the dressing was a bit too much and did not add all of it to the slaw. Go little by little tossing to coat until you reach your desired flavor and moisture level.

Jicama Slaw
Bobby Flay’s recipe found on Foodnetwork.com

1 large jicama, peeled and finely shredded
1/2 Napa cabbage, finely shredded
2 carrots, shredded
1/2 cup freshly squeezed lime juice
2 tablespoons rice vinegar
2 tablespoons ancho chili powder
2 tablespoons honey
1/2 cup canola oil
Salt and freshly ground black pepper
1/4 cup finely chopped cilantro leaves
Directions
Place jicama, cabbage, and carrots in a large bowl. Whisk together the lime juice, vinegar, ancho powder, honey, and oil in a medium bowl. Season with salt and pepper, to taste. Pour the dressing over the jicama mixture and toss to coat well. Fold in the cilantro. Let stand at room temperature for 15 minutes before serving.

No Tags
Categories: Sides & Snacks | Link to this post
Share it: del.icio.us • digg • reddit • stumble upon
January 11th, 2010 | 7 Comments »

bran-muffin-buttermilk

In an effort to feed my inner baking beast and stay within STRICT parameters of my New Year’s Resolution diet, I have started a Bran Muffin Bake-off.  Basically I am “baking off” against myself week after week in search of the best recipe.  My rating system is still being developed but the winner will likely have the best ratio of being healthy and delicious.  

For the past two weeks on Sunday evenings I have prepared the ingredients and on Monday morning, I have baked fresh bran muffins to start the week.  Deep breath in… ahh, yes, the house smells of fresh baked goods.  Deep sigh out… ahhh, yes… I have not ruined my diet on the first day of the week.  

This first recipe was passed along by one of my friends, Kathy, who has gathered the best of the best over the years.  My confidence in her recipes along with my love of buttermilk put this recipe at the top of my list.  They lasted for days and stayed moist in a tupperware on my countertop.  For those who aren’t on a diet, warm them up and slather these with butter and honey!

Stay tuned for the next bran muffin recipes. And, please send me links to your favorite, healthy bran muffin recipes.

Buttermilk Bran Muffins

1 cup unprocessed wheat bran
2/3 cup unbleached all-purpose flour
2/3 cup whole wheat flour
1 1/4 tsp baking soda
1/8 tsp salt
1 1/4 cup low fat buttermilk
1/2 cup sugar (Kathy suggests Sugar in the Raw, I didn’t have it)
1/4 cup unsweetened applesauce
1 large egg
1 1/2 Tbs canola oil
1 tsp vanilla
Optional: 1/2 cup dried fruit or raisins, chopped nuts, 3-4 TBS flax seed

Heat oven to 350 degrees and line muffin tins with paper cups. In a medium bowl, blend bran, flours, baking soda and salt until well combined. Use a whisk to combine all ingredients well or sift them together. Set aside.

In another bowl, using a handheld electric mixer on high speed, beat the buttermilk, sugar, applesauce, egg, oil and vanilla until frothy, about 2 minutes. Make a well in the center of the dry ingredients and pour in the buttermilk mixture. Using a spoon, stir just until combined. Don’t over mix. Fold in fruit, nuts or flax.

Divide batter evenly among 12 muffin cups. Bake until the tops spring back when pressed gently in the center, about 18-20 minutes. Do not over bake.

No Tags
Categories: Breads & Breakfast, Buttermilk Love | Link to this post
Share it: del.icio.us • digg • reddit • stumble upon
January 6th, 2010 | 4 Comments »

bird-glass.jpg

I’ve done it.  After a bit of lurking, I have actively jumped on the Twitter bandwagon.  I wasn’t sure I could handle another avenue of communication.  And, I am still not sure I have much worthwhile to say on a regular basis.  But, I don’t want to be that old curmudgeon that curses change and gets left in the dust.

So Tweeple, I have overcome my Twitanoia and will try not to get Twitphilia.  If you want to meet up in the Twitosphere, Whipped is here.

No Tags
Categories: Uncategorized | Link to this post
Share it: del.icio.us • digg • reddit • stumble upon
January 2nd, 2010 | 5 Comments »

cherries-jubilee

My mother is on the cutting edge of a new food trend. Most Christmases she makes a cherry pie. She believes in a colorful food presentation and the red rounds out the edible spectrum at the end of the meal. This year, out of nowhere, she mixed it up and presented Cherries Jubilee for the first time.

Cherries Jubilee is made with cherries and liqueur which is subsequently flambéed, and commonly served as a sauce over vanilla ice cream. Georges-Auguste Escoffier is credited with developing the dessert for Queen Victoria’s Golden Jubilee in 1887. Food history websites report that it reached its height of popularity in the 1960s, and was regularly served at restaurants, flambéed table side.

Last year’s food trends were all about comfort food. Everywhere you turned you found meatloaf, breakfast foods and macaroni and cheese. Well, the pendulum always swings back in the opposite direction. The television show Mad Men is bringing back everything that was hot in the 1960s. (I even saw pointy bras and girdle-like underwear in a new ad!) SO, I think it is likely that my sweet mother is at the VERY front end of a new dessert trend. The popularity of spectacular, flaming desserts will ripple across the nation.

Enough of comfort foods. It’s 2010. Let’s make a scene.

Cherries Jubliee

Serves 6

1 can pitted black cherries
1 tbsp. sugar
1 tbsp. cornstarch
1/4 c. warmed kirsch or cognac
1 qt. vanilla ice cream

Drain cherries, reserving juice. Mix sugar with cornstarch and add 1 cup of reserved juice, a little at a time. Cook 3 minutes, stirring constantly. Add cherries and pour kirsch over the top. Ignite kirsch and ladle the sauce over the cherries. Serve over vanilla ice cream.

No Tags
Categories: Desserts & Sweets | Link to this post
Share it: del.icio.us • digg • reddit • stumble upon
December 25th, 2009 | 7 Comments »

full-moon-brownies
Eating chocolate by the light of the full moon… there is only one woman I know who would recognize such a necessity. This Full Moon brownie recipe comes from Katrina Markoff, chocolate sorcerer of Vosges Haut-Chocolat. She explains on her blog that she has always been drawn to the full moon since gazing up at it from her childhood back yard in Ft. Wayne, Indiana.

The original Full Moon Brownie recipe calls for the Vosges Black Pearl Exotic Candy Bar (wasabi + ginger + black sesame seeds + dark chocolate). I used a different bar in this batch. I knew I wanted to pair the moist, rich bites with Wattleseed ice cream (Aboriginal wattleseed + roasted macadamia nuts + creamy custard ice cream). Wattleseed has a nutty, coffee flavor so I chose the Creole Bar (Chicory coffee + cocoa nibs + 70% Sao Thome chocolate) to bring out the coffee notes in the ice cream.) In hind sight, I realize I should have also added a few tablespoons of cocoa nibs to the batter for some additional texture.

I am lucky enough to cross paths with Katrina on a personal and a professional level and I have learned many valuable lessons from this unique woman. She is a dreamer who shoots for the stars. She listens to the beat of her own drummer with confidence. And, she knows how to cook, pair flavors, invent and bake like no other I know. On a practical note, she taught me how to criss-cross foil or parchment in my brownie baking pan for easy lift out and slicing. If you don’t know what I am talking about, Kristin uses this technique with her brownies and does a beautiful job of showing her step-by-step here.

These brownies made an easy make ahead dinner party dessert. You can buy Vosges Haut-Chocolat bars and ice cream at Wholefoods stores or online. Any quality dark chocolate could be used as a substitute but it is fun to pair the ice cream flavors with the bar flavors and experiment. The next full moon is December 31… get baking and consider this your chocolate howling to the moon.

Full Moon Brownies

7 ounce Black Pearl bar (or experiment with others)
8 ounce unsalted butter
3 tablespoon cocoa powder
3 eggs
1 cup sugar
1 tablespoon vanilla extract
1 teaspoon salt
1 cup all-purpose flour

Preheat oven to 350 degrees. Butter 8 inch square baking pan, line with parchment paper then line with 2 pieces of aluminum foil perpendicular to each other to enable you to life the brownie out of the pan with ease after they have been cooked.

Place chocolate and butter in a medium sized, non-reactive metal bowl and set over simmering water. Stir occasionally and whisk in cocoa powder until smooth, set aside.

In a mixing bowl, briefly whisk together eggs, sugar, vanilla and salt, about 30 seconds. Add warm chocolate mixture and then mix in flour just until combined, be careful not to over mix. Pour batter into prepared pan and cook for 35 minutes. When finished let brownies cool for at least one hour before removing from pan.
Cut into 1 inch squares and share.

Brownies can be wrapped in plastic and refrigerated up to 5 days.

No Tags
Categories: Desserts & Sweets | Link to this post
Share it: del.icio.us • digg • reddit • stumble upon
December 21st, 2009 | 2 Comments »

But not this Caroline (snivel, snivel). Thank you a ton (of cookies) to everyone who voted for me at Bon Appetit. I didn’t really expect to win but the flicker of hope was nice. It feels good to want sometimes especially when I am so fortunate in health and happiness that I want for things like winning a bake-off contest. I didn’t expect to have so many of you take the time to vote and since I had promised you all cookies if I won… I have escaped long nights of baking to fulfill my promise. Always a silver lining! Try out the OTHER Caroline’s winning cookies here.

No Tags
Related Posts with Thumbnails
Categories: Uncategorized | Link to this post
Share it: del.icio.us • digg • reddit • stumble upon

FireStats iconPowered by FireStats